Saturday, December 31, 2011
The Last Disappointment of the Year
As the title suggests, I have disappointing news to report. I finally made time today for the installation of my new tail light. Unfortunately, when preparing to wire in the new light, I discovered what was shipped to me was not what I ordered. First off, the metal support on the back of the light was bent. I wasn't worried much though because I was already planning on making a side mount license plate, and would mount the light there. No big deal. However, I soon realized that the light appeared to be missing a couple of wires. What do we have? Run...yes, stop...yes, ground...yes, signals...NO! I was going to give the Ebay seller a chance to rectify the situation. I've sent him a message explaining my dilemma, but have had no respose yet. I went back to check the listing, and it has been deleted. I did however look through my purchase history, and the title for the listing cleary states it is an integrated run/turn/stop light. I will give the seller the benefit of the doubt, and blame his inattentiveness to my situation on the Holiday.I plan on giving him a few more days, and then will be forced to file a claim with Ebay. Despite this unwelcome set back, I have managed to pick up a piece of sheet metal, and draw out a template for my license plate/light combo. I'm also currently scouring Ebay for a fender, or fender blank that can be cut, and shaped to follow along with the direction of my build. I may simply pick up a used Vstar Classic fender and modify it, or pick up an after market fender. So long as it contours around the tire, and leaves enough length on the end to shape,I'll be happy. I will post more on this later. Well it's almost time to go ring in the new year, so I will sign off one last time for 2011. I hope the new year brings all of you happiness, good health, prosperity, and plenty of good riding weather. See you in 2012....ride safe.
Friday, December 23, 2011
Tail Light and Signals Revisited
If you've been following along with this blog from the beginning, you already know I've previously replaced the OEM tail light, and rear turn signals. However, my recent thoughts are to replace both with an integrated run/turn/stop light. I'm thinking, while I'm at it, I may pick up a small piece of sheet metal and make a side mount license plate. If so, I plan on mounting the new tail light to it instead of back in the stock position. I've purchased what is referred to as a cat's eye styled tail light due to the uncanny resemblance it's shape bears to that of an actual cat's eye. My decision to purchase the integrated light is driven by my thoughts of replacing, or customizing the current rear fender. Removing the tail light, and current license plate mount will significantly increase the range of rear fender options. If I do remove the current signals completely from the rear fender, I may try to incorporate them in with the front signals giving either side of the headlight a dual setup. One pair of the signals will remain as running lights, while the other will be strictly signals. The idea is to wire them both to flash when signaling left or right, then have the dual filament lights simply remain on after the turn is complete. With the Holiday season upon us, my time for the bike will be limited as much of this time is spent with the family. I'm sure I'll manage to squeeze a little extra time out eventually though, and will repost later with pics of the light, and perhaps the install. I will certainly give more details then including my design ideas for all that I have planned. Until then...enjoy the Holidays, and ride safe.
Friday, November 11, 2011

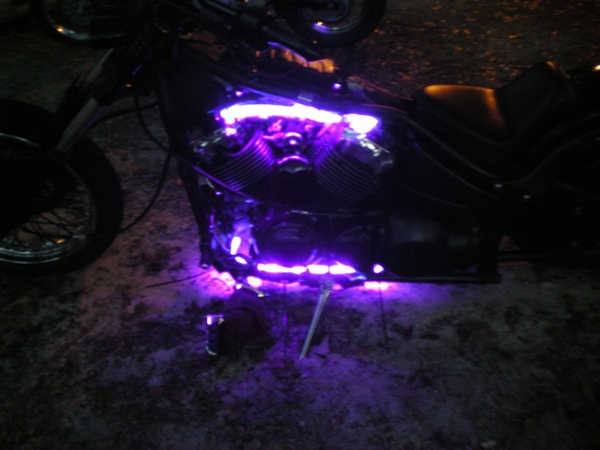

My VStar is now much more visible at night. I’m happy to announce that the addition of the extra strip of lights, achieved exactly what I’d hoped for. The purple, or more appropriately called UV lights, have had somewhat of an entrancing effect though, and I feel now that I might want to add even more elsewhere on the bike. I am still mulling over fender options, and different ideas for the back of the bike, so I don’t think I’ll attempt to add anything there yet. I have thought about adding some temporarily behind the Kury axle covers, and perhaps find a way to add some near or under the triple trees. I still have the 4 individual lights that were purchased originally from a delusional seller on eBay, listing them as a complete bike lighting kit. Unbeknownst to me, the only thing complete about the listing was the fact it completely misrepresented the product. So now I’m stuck with the 4 small individual lights, and have the perplexing task of planning a way to incorporate them on my bike, or feel that I totally wasted money on them. My current thought leads me in the direction of the triple trees, or perhaps a little higher into the riser/bar area. I considered somewhere along the lower fork tubes, and perhaps even down around the fork bullets, but don’t really like the idea of wire running the length of the front end. For now though, I’ll enjoy what I have, and the gained attention derived from the curious onlookers wondering if they are being invaded by little green biker men from Mars. The pictures I’ve included show where the lights were placed along the top double back bone of the VStar , and again on both sides of the lower frame. Their placement is a bit closer to the heated areas of the bike than I would like, but after a couple of rides allowing the engine to fully warm up, everything appears to be ok. Thus far, I haven’t had to clean melted LED strip lights off of the lower side of the engine, or exhaust. So for now, I’ll assume they have found their permanent home, and I’ll continue my quest to find more unique ways to make my VStar stand out from the crowd. Until my next post….ride safe!
Monday, October 24, 2011
Good Source for Vstar Information
I've mentioned a few informative sites of interest throughout my posts, and decided I needed to throw one more very helpful site out there for your benefit. The Yamaha Motorcycle Forum is a great group, that are very helpful for all bike enthusiast. The primary focus is simply the Yamaha/Star brand, and includes all bikes that fall within that category. There are individual groups within the forum dedicated to each bike. I personally enjoy reading,learning, and hearing about the experiences shared from all of the groups. I will admit though, I do spend most of my time perusing through the Star 650 Classic and Custom group the most.Becoming a member is just a simple matter of registering on the homepage.Incase you are wondering, no, I'm not in anyway affiliated with the forum other than being a member. I have simply found this particular forum to be very friendly, and most helpful for all of their members. Therefore, I feel they certainly deserve a good mention here from me. As for my bike, it still awaits the installation of the new lights. I've yet to tear it apart, and begin the proccess of figuring out the best position for the install.It's hard to see it sitting in an unrideable state while the weather is so nice. I do plan on making time for the lights very soon, and will post more with the results of the additional strand then. Hopefully, there will be a noticeable difference to report. Until next time...ride safe.
Sunday, October 23, 2011


There hasn't been much to speak of lately, but I'll give you a quick update on my expected modifications for the near future. The lights that were purchased from a seller on Ebay have arrived, and I plan to tackle adding them asap. I ordered an extra 48 inches to go with the current 24 that I have already installed. I'm thinking I may add these to the lower frame, facing up toward the bottom of the motor. The top half is nicely lit, but I'm just wanting things a little brighter. I'm thinking there may be enough of the light strand to follow along the frame behind the motor as well. I guess the placement issue will be a trial and error project. With 6 feet of lighting, I'm sure I can get things just about as bright as it's possibly going to get. I'm still searching out the best price I can on the spiked risers I would like to add. Again with Ebay, I have found a couple that are reasonably priced, but will still need powdercoat or paint for the gloss black. There are spiked risers that are anodized black, but that not only is a little different color, but they are about double in price of the others I've found. As with all of the items I've purchased, I've found that if I search hard enough I will eventually get what I'm after without giving up and arm or leg for it. In the meantime, the wife and I enjoyed a great ride out under clear blue skies. I couldn't have asked for better weather, or a better riding partner. We traveled until we ran out of asphalt, stopped for a quick break and picture opportunity, and made our way back home. I hope you all have a chance to get out and enjoy the fall weather as well, and as always ride safe....
Sunday, October 16, 2011


The weather was nice, and I had some spare time on my hands, so the recently purchased grips were beckoning me to install them. The left side went on without a hitch. I'd guess in less than a minute. The right side however decided to be difficult. After adjusting the speedo cables to give me enough slack to work with, the round ends of the cable, the ones inside the throttle housing, just did't want to cooperate. I've removed the grips countless times, but I was always installing the stock grips back on the bike. This time, the grips were markedly different. I was prepared though for any slight issue with the grips being specified for Harley. They were for 1" bars, so I figured it wouldn't be that difficult to adapt over. Really the grips were fine, and fit the house ok, but for some reason, the throttle sleeve pushed the ends so close together that I amost couldn't get them in. After a good bit of wrangling,lots of grumbling, and borrowing an extra set of hands from the wife for good measure, they are on. In the pictures, I still have the leather lever covers on. They seemed a little out of place without the leather grip covers, so I've removed them as well. I'm still awaiting on a few things from Ebay, but I will save that for later. Until then...ride safe.
Thursday, October 13, 2011
Slow Progress

The last remaining stock item on the front of my VStar will soon be no more. The grips I purchased through Ebay have arrived. I was a bit worried at first because the price was so unbelievably low when compared to some of the other name brands I originally considered. Now that they are in my possession, and I have thoroughly given them a good once over, my fears have been laid to rest. I am currently bidding on a set of risers to match, so I’m going to wait and see how that goes before installing the grips. The left grip uses 3 set screws to secure it to the handle bars, while the right will be secured by the throttle housing. They appear to be nice solid grips, and just what I was looking for. I expect to know something about the risers in the next few days, and will keep you informed of the latest additions.
On a side note, I really liked the looks of the UV lights installed along the frame, under the tank, and shining down on the top of the engine. So, I have purchased a few more feet of the UV strand lights to add at various locations around the engine which will hopefully brighten things up. The UV( purple) color isn’t as bright as some of the other available colors so I’m adding the new lights to achieve the same results I’ve seen on other bikes. I should receive the lights around the end of October, or perhaps the first week of November. In the mean time, I will continue to troll through Ebay looking for anything that may spark a creative interest. Until next post…ride safe.
Monday, October 3, 2011
Black spikes!!!
No, I'm not thinking about riding the bike in a pair of my Wife's heels. That wouldn't exactly be the safest thing to do...she'd kill me. I'm talking about spikes for the bike.While looking my VStar over trying to decide what’s next, I made the observation that I’ve managed to swap out, or modify almost everything on the front with the exception of handgrips. I did add leather covers to both the grips and levers. However, I’m feeling it’s time for a change. Keeping with the black theme, I found a set of grips on eBay that are not only black, but spiked as well. Currently, the front sports a set of spiked fork bullets, as well as the fork tabs that I cut and shaped into a spike. I surmised the addition of the grips would add to the “look” my VStar is starting to exhibit, so they are on their way. I should receive them in the next couple of weeks, and will give more details on them then. This brings up the topic I left off with in my last entry.
I mentioned wanting to try my hand with metal, or fiberglass because of my desire to have a unique, one of a kind, rear fender. Black and spiked seems to fit the build best. I’ve thought, scrutinized, measured, and planned out several ideas in my head. All would work, and look good in theory. I just don’t know if the actual application would do the same. I will add though, I’ve strongly considered taking the easy way out with a not so unique look, just buying a fender, and cutting it to suit my style. My original plan was to build a fender that would bolt where the current fender struts do now, and do away with the struts completely. This would, in my opinion, make the lines of the bike flow much better. If I did venture into the realm of creativity for my fender needs, I would also like to design it as to include a custom made seat as well. I guess I’ll have to do a bit more research to see what I feel comfortable with, making one, or simply buying the fender and modifying it.
On a final note, while looking around on eBay for grips, I found another tidbit I might pick up if the price is right. Though I’ve replaced the risers already with Phat Risers, I might possibly change them out as well. There is a pair of black spiked 6” risers that I have my eye on. I’m not completely committed to the idea yet, but it’s definitely something I’m considering. The black theme was always the central idea, obviously because it’s a Midnight Custom. Within this past year or so, the spikes seem to be creeping their way in. I have a little more planning to do, but as you can see, I will have lots to talk about later…..Ride safe!
Thursday, July 14, 2011
Powdercoating


As promised, here are the pictures of the newest additions to my Vstar. I have the tube covers installed, along with the fork bullets, and Kuryakyn axle covers. All are glossblack powdercoated for extra durability. I'm thinking I might powder the fork sliders. Though they are already black, it's not exactly the same color. It may be more visually appealing to have all of the individual parts on the front match. Otherwise, I'm ready to begin my next little project. I'm still considering some of my options at this point. Should I purchase what I need pre-built, or do I try my hand at metal fabrication, or perhaps fiberglass. I guess we'll just have to wait and see. I will reveal more later. Until then...ride safe.
Sunday, June 5, 2011
Where there is a will...


There is a way. Of course, a boring Sunday afternoon, a roll of masking tape, and paint are required. I finally decided to do a little something with that plain ole stock front rim. Though I would like to have added a fancy custom wheel to my VStar, this little project added my own custom flair to the current laced wheel. With a little time on my hands, I removed the front wheel assembly, cleaned it thoroughly, and started what turned into about an hour of masking tape fun. I masked off the entire rim, about two inches out from the rim around the tire, and each individual nipple per spoke. Yes this was very tedious. Then came the paint. I added two or three good solid coats each of Rustoleum self etching primer, gloss black, and clear enamel. After letting it dry completely, I spent a second hour of tedious work removing the masking tape. Clearly, the tape is the hardest part of the job. I guess compared to the alternative, unlacing and relacing spokes, the tape doesn't sound too bad. So the end product is now a chrome rim with black spokes. I'm pleased with how this turned out, looks just like those custom jobs I've seen, only at a fraction of the cost. While the axle is out, I plan to have the end machined down to match the stock metric axle. If you'll remember back to when I installed the new triple trees, the axle they sent had a very large head protruding out just enough, preventing me from re-using my fork bullets. I've also stripped the fork bullets of their paint, and along with the recently purchased axle covers, and the fork tube covers, I plan to have them all powdercoated gloss black to match the rest of the powder coated items on the bike. I previously had them painted, but felt like the powder would withstand the abuse from the road a tad bit better. Hopefully I will be able to have the powder coat guy get to this next week. I plan to update with more pics as soon as I have everything back and installed on the bike. For now, I've simply posted pictures of the wheel that was just completed. So, there is definitely more to come later. Until then, ride safe....
Friday, May 27, 2011
Success!!!


After receiving the strip lights from Ebay, I completely removed the individual ones. There was a very noticeable difference between the two options. The strip was much easier to install, and is far brighter than the single LEDs. While working on the bike, I wired the singles with enough wire to try several placement options. Unfortunately, the singles just don't cut it for me. I will probably add a few more strips under the frame and at the back wheel, and not worry with the dim little singles. The switch is a push button which I've installed in the speedo housing just below the speedometer. I have included a few pics of what I have so far. The first picture shows one of the individual lights that have now been removed. The next pic shows the bike with my camera flash on, and the next is with it off. Sorry,I know the pictures aren't the best. Perhaps a new camera is in my future. I will update more later, ride safe.
Monday, May 16, 2011
Lights
Recently, the mod bug struck again. I purchased some lights on Ebay, to install under the tank, however was very dissapointed. I received 4 individual LED lights, and a push button switch. These lights are very, very dim. To remedy the problem, I've purchased a few feet of strip lighting (again from Ebay) to add with the small individual bulbs. I will probably move the smaller individual lights to the rear of the bike. I have also bought a set of Kuryakyn axle covers used that require a bit of sanding to remove the rust. Afterward, they'll get a good coat of gloss black, and a clear coat for that extra shine. The covers will perhaps be the new placement for the smaller LED lights. When all is said and done, hopefully, the bike will shine a brilliant purple around the engine, and likewise should reflect purple back off of the previously installed wheel cover on the rear tire. That's the plan anyway. We'll see how everything goes. I will post pics when it is all complete. Until then....ride safe!!!
Subscribe to:
Posts (Atom)